If you’ve ever visited an Asian bakery, you’d have noticed that the tables are predominantly covered with bread-y pastries.
Baked Red Bean Buns
Some are savory and others sweet. Most of the fillings are very common to Asians, like red bean paste, lotus paste, and custard for sweet buns or charsiew, curry chicken, pork/meat floss, and sausage for savory buns. I especially enjoy things that have red bean filling in it.
When I first got to San Jose, I would try out different Asian bakeries for their buns. Almost every bake shop that sold these lovely treats would charge between $0.75 to $1.50 for ONE! And most times, when I’d bite into one, the filling would be so little and most of the bun would just be bread. Very disappointing!
I Dread Baking Bread
For a long time, I avoided baking them myself. The main reason for this is that I have a dread of baking bread. I don’t know why…I just always thought I would fail dismally at baking bread. After one too many disappointing buys of these costly buns, I decided to just suck it in and try baking these treats myself.
I searched online and also looked on some food forums and even bought a book on Asian breads. Armed with as much information as I could, I bought all the ingredients and, psyching myself up to bake bread, I did it. My first time wasn’t the best, but it wasn’t the worst either. Seriously, people, I had a great dread for baking bread. I can’t explain to you how reluctant I was to do it.
And guess what, it wasn’t so bad! I don’t know why I was so fearful of bread-baking. Since then, I’ve actually baked a lot of different types of bread. I’m still a little scared of plunging into artisanal breads—foccacia, sourdoughs, ciabatta, french loaves, etc. But one day, I know I will get there.
The Apprentice
And some cookbooks really did help me to understand bread. Peter Reinhart‘s The Bread Baker’s Apprentice inspired me with his beautiful pictures and wonderful introduction (still a little scary–the bread world sounds very precise and yet, sometimes unpredictable). Rose Levy Beranbaum‘s The Bread Bible was the best help for me! She gave such detailed and precise instructions that I felt confident that as long as I followed along, I would get it right.
But these books don’t talk about Asian breads. Asian breads tend to be soft, light and sweet. Something like Portuguese Sweet Bread but with fillings or fluffy dinner rolls. Alex Goh’s book on Asian breads helped a little to give me some understanding but the information is not as in depth or as precise as the first two books I mentioned.
Anyhow, if you’re like me and really scared of baking bread (for irrational reasons), let me encourage you: "If Ann can bake, ah, so can you!" (Ok, that was lame – I don’t even like being called Ann – but just couldn’t help myself! ^_^ )
Baked Red Bean Buns
Adapted from "World of Bread" by Alex Goh
Ingredients:
(A)
480g Bread Flour
120g All Purpose Flour
110g sugar
10g salt
20g Milk Powder (I substituted with Coffee Mate)
4 tsps Instant Yeast
(B)
1 Egg
300 ml Cold Water
(C)
60g Butter
Method:
1. Mix (A) till well blended.
I just stirred it around with a spoon.
2. Add (B) and knead on your mixer with hook attachment until it forms a dough. I add the egg and then turn the mixer on slow and drizzle the water in slowly as it is mixing.
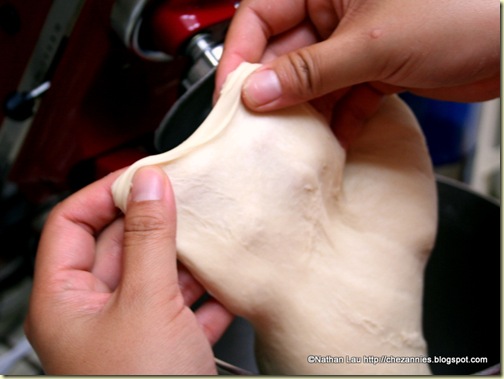
3. Add (C) and continue to knead to form a smooth and elastic dough, about 10 minutes on my Kitchen Aid on 4 speed (with breaks when the motor got hot).
Dough is ready when you can "windowpane" it
4. Gather dough into a ball and place in a bowl that has been oiled. Flip dough around to oil the entire dough. Cover with plastic wrap and let rest for about 50-60 minutes or till it doubles in size. If you are having trouble getting it to double, here’s a tip:
- Fill a small bowl with water and microwave on high for about 1 minute. Move bowl to corner and sit your dough in the hot steamy microwave (with the door closed, of course) for the resting time. That should do the trick!
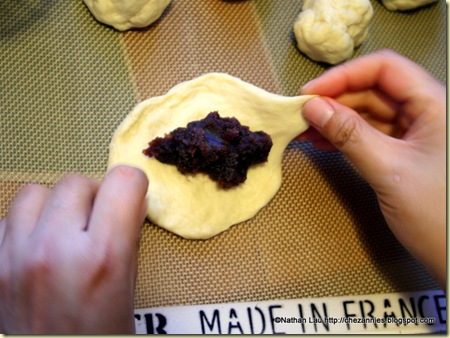
5. Once dough has doubled, divide the dough into small balls (you should get between 18-24 pieces depending on how big or small you want your buns to be). Rest for 10 mins (normally by the time I’m done with the last ball, the first ball is ready for filling) and then fill with red bean paste (about 1-1.5 Tbsp per bun):flatten the balls, put the paste in the center and gather the dough around the paste and pinch to close.
Red Bean Filling in the Bun
Flip over and put the pinched part on the bottom of the parchment lined tray (make sure to space them a few inches apart).
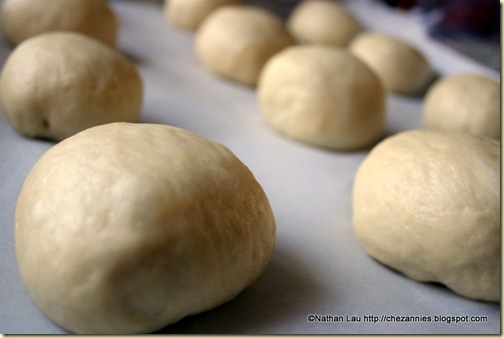
6. Once all the buns are done, cover loosely with plastic wrap and let it proof for another 50-60 minutes or until doubled in size.
Filled Red Bean Buns Proofing
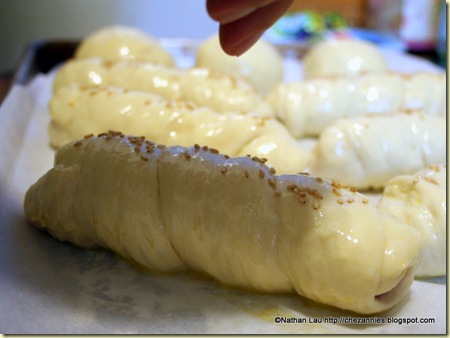
7. About the last 10 mins of proofing, preheat the oven to 350 F. Beat one egg and brush the buns gently with eggwash. If you desire, sprinkle some toasted sesame seeds on the bun.
Sprinkling Sesame Seeds on Sausage Buns
(I ran out of red bean filling and used the leftover dough for sausage buns. Basically, you roll out each ball into a long rope. Twist the dough around a hotdog leaving only the ends peeking out. Leave it to proof like the rest.)
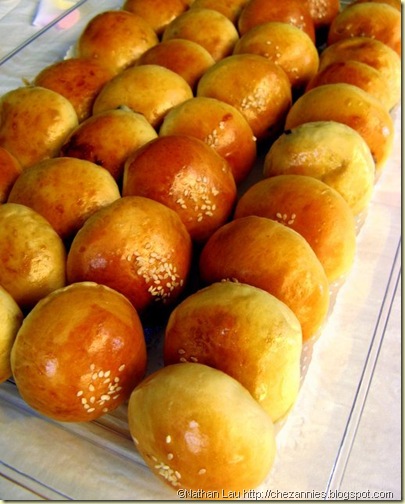
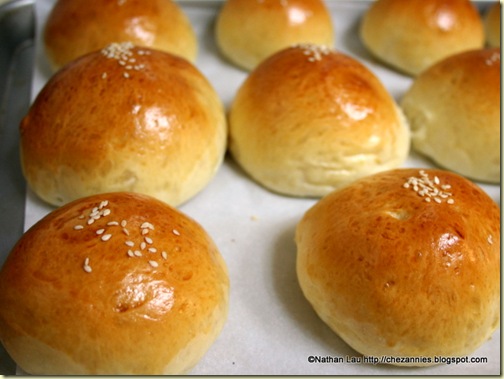
8. Bake in the oven for 12-15 mins or until golden brown on top.
Baked Red Bean Buns – Golden Brown and Delicious!
A few tips for this recipe:
- Use a scale (ok, not a tip but a directive–I’m still working on converting everyone!).
- It’s much easier if you have an electric mixer but you can do it by hand (just don’t ask me how, cuz I have not done it like that before). If you have an electric mixer (I use a Kitchen Aid with dough hook), it takes about 10 minutes of kneading on medium speed (speed 4-5) to get the right texture on the dough.
- Let your machine rest in the middle of kneading (it gets hot and I worry about overheating and killing my mixer).
- Don’t walk away from your mixer–bread doughs are tough and will cause your machine to "walk" right over your kitchen counter!
- Don’t let your dough rise too high (about 1 hour and double the size is best).
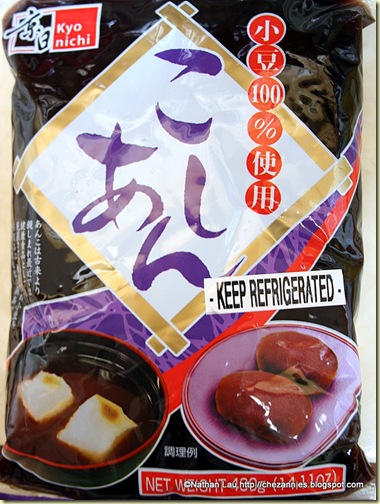
- Get the red bean filling from a Japanese grocery store (they sell the kinds that come in a plastic bag). Choose this type over the ones in a can because the canned ones have a metallic aftertaste that ruins the red bean flavor.
Japanese Azuki Bean Paste
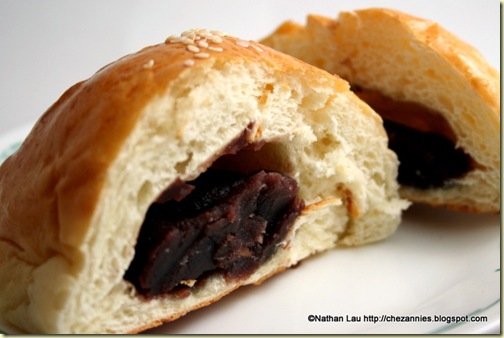
- Don’t get too greedy with the filling. On my first attempt, I wanted to make up for those lame buns I got at the store and overfilled them. Balance is key (the bread is yummy too so overfilling just takes away from that).
Balanced, Baked Red Bean Buns
Enjoy!
Cheers, Annie
This post was entered in the Weekend Herb Blogging roundup, created by Kalyn of Kalyn’s Kitchen and hosted by Susan at the Well Seasoned Cook.
>Great post, and I am very impressed that you made these yourself. I had this type of bun when I went to China and they were delicious. Love the step-by-step directions and photos.
>@kalyn – thanks! where in China did you visit?
>Hi there! Thanks for the comment on my blog. I love your posts and your photos. And this one is particularly wonderful. I studied abroad in Japan for about a month when I was 16 and have been dreaming about these red bean buns for the last 11 years! They’re so wonderful–I’m definitely going to try your recipe. Have you had the fish-shaped waffles stuffed with red bean paste? I have never seen those in the US and I would love to try one again someday… Thanks for the great recipe 🙂
>@LNE – let us know how they turn out for you.
Re: the red bean-filled fish – do you mean taiyaki? I haven’t had them myself but there is a place here in the Bay Area that makes them, called Sweet Bream:
http://www.foodgal.com/2008/12/sweet-breams-are-made-of-this/
>Oh my dear sweet lord. I have been scouring the interwebs looking for a recipe for these baked red bean buns. Finally I found it! I made a batch of these just minutes ago and they are just as delicious as the ones i purchase in Chinatown (at a buck fifty a pop).
These are to die for. I did have to use canned red beans (because i didn’t want to wait until tomorrow to make the paste myself) but I have never noticed a metallic taste in the kind I get so I was lucky there.
I also want to note something. Don’t convert this recipe to the US measuring system. I did the first time and had to trash my dough wad because of this. Chalk it up to being to lazy to pull out my easy to use digital scale. D’oh! After that though, it was smooth sailing. I would say this recipe is easy as pie, but I think it is actually easier.
>@Joanie – Thanks for the feedback! Hope to see a red bean bun in one of your bentos soon!
>what are the measurements in cups? I dont have a scale but i’d love to try this recipe… 🙁
>What do you mean when you subsituted the milk powder with coffee mate?
>@Candace – You can always Google up a measurement converter. But really, I highly recommend getting a digital scale that can toggle between metric and imperial measurements.
@Anonymous – just that. Instead of using dried milk powder, we used the Coffee Mate brand non-dairy creamer.
>is it ok if i make the dough a day ahead or will it just continue to rise and cause a problem??
>I tried this recipe and it was great!! I’ll use it from now on.
>@Anonymous – you could try to retard the rise by putting the dough in the fridge. We’ve not tried that for this dough before, so we cannot guarantee the results.
@Candace – great! I’m glad you like it.
>Hi Annie,
Thanks for the recipe! Trying this one out today.
Also, beautiful pictures… could you please tell me the type/model of camera used?
Thanks, and aloha from Hawai’i!
>@Angelica – I’d say that most of the pics were taken on the older Canon Powershot A710IS, while the rest were taken on the newer Canon Rebel XT. Can you tell which is which?
>can you convert the measurements to like cups and teaspoons? please
Hi Annie
I am Malaysian in NZ atm. Although I can find nearly everything here in Auckland, but there are some like “siew bao” that you really gotta DIY.
I never done any baking until I am in NZ. And to my surprise some of it is pretty easier to make. Ciabatta & sour dough is very easy. Not much kneading, all you need is patient, you took nearly 1-2 full days to finally bake them! You should try it!
any tried & tested recipes for ciabatta & sour dough
is it true that to obtain asian style fluffly soft texture; bread improver & bread softener to be used?
I made these for New Years. I have a KitchenAid but had never tried the dough hook, so I thought I’d give it a go…I gave it up and kneaded by hand because it kept trying to push the dough up and out of the bowl. But I think the end result was the same – fantastic! I thought I’d have some left over to take to work, but they disappeared.
Hi there. Does anyone know where the red bean used is sold in SINGAPORE?
You should be able to find it in any baking supply store.
I like your post on baked red bean buns. They sure do look yummy. 🙂
Good information. I’ve just tried making them. Just wonder is my dough supposed to be that sticky. Even after I baked them, and stacked them together, they just stick to one another after a day.
Btw, I have omitted the coffee powder but not intentionally. Any different with or without it?
Thanks for your patience and time in answering my above questions.
If you dough is sticky, you need to knead it some more. This dough does tend to be more sticky especially if you’re in a hot and humid climate. I’ve had more trouble with it here in Kuching than when I was in San Jose, California. As for sticking together after baking, I’m not sure what you can do. Perhaps you can try baking it a little longer to dry it out more, or refreshing it on the next day by re-toasting it in the oven.
As for your question about coffee powder–I think I mentioned I used coffee mate which is coffee creamer and I only used that as a substitute for milk powder (which if you have you should use for a sweeter, richer flavour).
Hope this helps.
Sorry, I forgot to add that if the dough is still very sticky after a long knead, you could try adding more flour (up to 1/2 cup) to see if that helps.
Thanks for your prompt reply. When you mention adding more flour is that the all purpose one or the bread flour. Also any different if I used margarine instead of butter.
Thank you once again for your patience.
You can use either bread or all-purpose flour. As for the difference between margarine and butter, I can’t say that it will make a textural difference, but the flavor of butter cannot be compared or substituted with margarine. I leave it to you to decide on that one.
Finally I managed to bake a more pleasant one. Thanks for all the input. But one thing remains… I can’t make a round shape but instead it turns out more of a square shape bun. Any suggestions for this?
Appreciate your advice once again.
If I ever win the lottery, you’ve got a job lined up! I am loving the simplicity of your recipes, and the obvious care taken in making them so easy to understand and follow. Thank you for your efforts, and your putting together your blog.
Hi Annie,
I can’t wait to try this out. I have always wanted to make buns.
I can’t use powdered milk or coffee mate i.e. lactose intolarent. However, I am OK with evaporated milk. Can you please let me know if it’s OK to use and what is the quantity. Or should I ommit completely.
Many thanks in advance.
I tried to do twice but failed. The first time the dough seemed wet so I added more bread flour and baked. The result was the bottom of the bun seemed hard/blacken. The top was still soft.
The 2nd try: I reduced the water added and also lowered temperature to 325 deg due to my hot oven… The result was worse…The buns came out tougher like cookies…
I did convert all your measures to cups/tablespoon..Not sure if this created the bad dough? Help!!!!
Thanks
Thanks so much for this recipe!!! These turned out exactly like the ones I would buy at the local Japanese market. Following the recipe was easy and they turned out the first time despite me not being very good at baking.
They’re definitely best fresh and on the day of, but stay good for quite some time. Going to make a fresh batch and bring them to the anime convention I’m going to this weekend! 🙂
Monica,
thanks for your comment! We’re glad you were able to make them. Tell all your convention friends where you got the recipe 😉
BTW, have you seen Geek and Sundry’s coverage of our Piggy Mooncakes?
http://theflog.geekandsundry.com/view/felicia-day-robin-thorsen-get-piggy-with-it/