Updated 20 Nov 2010
Originally posted 20 April 2009
There’s nothing better than fresh, homemade bread. Here are two easy recipes for how to make the best, pillowy-soft dinner rolls from scratch. Perfect for your Thanksgiving and holiday meals.
Buttery Dinner Rolls
Have you ever wanted to look for a recipe for something and then ended up with so many choices that you are paralyzed on which one to try? Or even more crazily, you try to incorporate a bunch of them into one recipe?
That’s how I was recently while looking for the ultimate dinner rolls. I’ve tried baking buttery dinner rolls using Rose Levy Beranbaum’s recipe from “The Bread Bible” before. They’ve turned out really well but I want something that will knock my socks off and make me want to keep eating them (even though with each buttery bite, more fat makes its way to my hips). That’s what I’m looking for baby!
Which Roll Rocks?
So I looked up a bunch of recipes for buttery dinner rolls and after looking, comparing and reading reviews, I decided to try the recipe I found on Food Network. I actually baked up a batch of these Food Network dinner rolls along with a double batch of Beranbaum’s recipe just to be able to do a comparison of taste. And no, I’m not on a carbo-load. I just had a dinner event to go to and my contribution was bread.
So after baking them both, I will tell you that they are both good. There are some differences between the two buttery dinner rolls. Both are reasonably easy to make (especially if you have an electric mixer to do the kneading for you) but one is more time-consuming. Beranbaum’s recipe requires an overnight rest in the fridge for the sponge (for maximum flavor development) followed by three more rises. The Food Network recipe is quicker – it only calls for two rises and can be done in a day.
It’s Not Just Flour, Yeast and Water
The other difference in the recipes is in the ingredients. Beranbaum’s recipe does not call for eggs whereas the other one does. Beranbaum’s also asks for dried milk powder (which I substituted with Coffeemate—because that’s what I had handy). The Food Network recipe calls for milk. That recipe also called for more sugar. Also Beranbaum’s recipe calls for the rolls to be dipped in melted butter in the last rise—that makes them super delicious but also means getting your hands oily while buttering them up. The other one just asks for them to be brushed on top with butter after the rise.
Overall, I think if you like your rolls to be sweeter and more enriched, the Food Network recipe is better. But Beranbaum’s recipe is also delicious and I find the texture more pleasing but less like sweet dinner rolls and more like plain dinner rolls with a buttery fragrance (from the lack of egg). At the end of the day, I was conflicted. I enjoyed them both but the time and effort in making Beranbaum’s recipe made me think that the Food Network one is a more useful, daily recipe.
I’m going to post both recipes here so that you can decide for yourselves which you’d like to try.
Butter-dipped Dinner Rolls
from The Bread Bible by Rose Levy Beranbaum
makes 12 dinner rolls
Ingredients:
Dough starter:
6 oz (170 g or 1 cup plus 3 Tablespoons) unbleached all-purpose flour
¾ cup plus 2 Tablespoons water, room temperature (70° to 90°F)
1 Tablespoon plus ½ teaspoon honey
¼ teaspoon instant yeast
Flour mixture and dough:
5.5 oz (156 g, or 1 cup plus 1 ½ tablespoons) unbleached all-purpose flour
(use only Gold Medal, King Arthur or Pillsbury)
2 Tablespoons dry milk, preferable non-fat
½ teaspoon instant yeast
4 ½ Tablespoons unsalted butter, softened
1 1/8 teaspoons salt
4 Tablespoons unsalted butter, melted and cooled
Method:
For dough starter:
1. In a mixer bowl or other large bowl, combine the flour, water, honey, and instant yeast. Whisk until very smooth, to incorporate air, about 2 minutes. The sponge will be the consistency of a thick batter. Scrape down the sides of the bowl and cover with plastic wrap.
Dinner Rolls Dough Starter
For dough:
2. In a medium bowl, whisk together the flour (reserve ¼ cup if mixing by hand), dry milk, and instant yeast. Sprinkle this on top of the sponge and cover tightly with plastic wrap. Allow to ferment for 1 to 4 hours at room temperature. (Or for maximum flavor development, ferment for 1 hour at room temp, and then refrigerate for 8-24 hours). During this time the sponge will bubble through the flour blanket in places: this is fine.
3. Mix the dough. Using a mixer, add the butter to the bowl and mix with the dough hook on low speed (#2 if using a KitchenAid) for 1 minute or until the flour is moistened enough to form a rough dough. Scrape down any bits of dough. Cover the top of the bowl with plastic wrap and allow the dough to rest for 20 minutes.
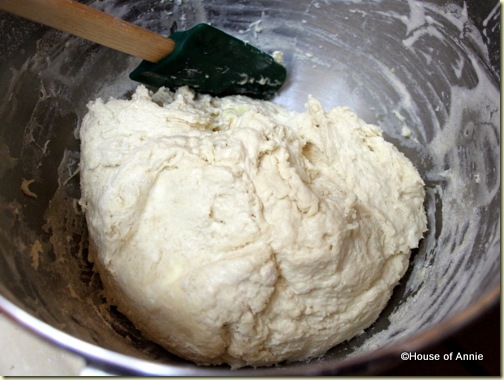
Dinner Roll Dough Before the First Rise
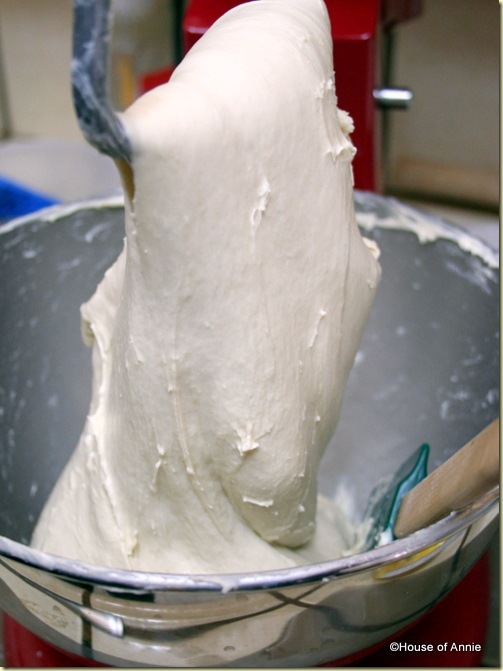
4. Sprinkle on the salt and knead the dough on medium speed (#4 on KitchenAid) for 7 to 10 minutes. It will not come away from the bowl until toward the last minute or so of kneading; it will be smooth and shiny and stick to your fingers. Scrape down any dough clinging to the sides of the bowl. If the dough is not stiff, knead it in a little flour. If it is not at all sticky, spray it with a little water and knead it in. (It will weigh about 22 ounces/629 grams.)
Dinner Roll Dough Ready for Second Rise
5. Scrape the dough into a 2-quart dough-rising container or bowl, lightly oiled with cooking spray or oil. Push down the dough and lightly spray or oil the surface. Cover the container with plastic wrap. Allow the dough to rise (ideally at 75° to 80°F) until doubled, 1 ½ to 2 hours.
6. Transfer the dough onto a floured counter and press it gently into a rectangle. It will be full of air and resilient. Try to maintain as many of the air bubbles as possible. Pull out and give it 2 business letter turns (ie. left to center, right to center, flip and repeat) and set it back in the container and oil the surface, cover, and allow the dough to rise for 1 to 2 hours or until it doubles again.
7. Shape the dinner rolls. Cut the dough into 12 even pieces. Work with one piece at a time, keeping the remaining dough covered.
8. If the dough is sticky, flour your hand—but not the counter, so that the dough has a little resistance to help shape it. Roll each piece of dough, cupping your hand over it, to make a smooth ball. Seal the small indentation that forms in the bottom by pinching it tightly. This will help to make a tight skin on the outside of the roll, which will give it an even shape during baking.
8. Pour the butter into a small bowl. Dip each dough ball into the melted butter and coat all sides, then place it pinched side down in the pan, making 3 rows of 4 rolls each (if using a square pan or just arrange in a round pan as evenly as possible).
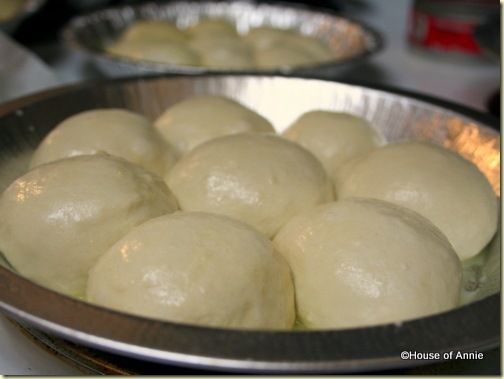
9. Cover the pans loosely with oiled plastic wrap, and allow the rolls to rise for about 1 ½ hours, until double; the center of the tops will almost reach the top of the pan. When the dough is pressed with a fingertip, the indentation will remain.
Buttery Dinner Rolls After the Third Rise
10. Preheat oven to 400°F 1 hour before baking. Have an oven shelf at the lowest level and place an oven stone or baking sheet on it, and a sheet pan or cast iron skillet on the floor of the oven, before preheating.
11. Quickly but gently set the pans on the hot baking stone or hot baking sheet, and toss ½ cup of ice cubes into the pan beneath. Immediately shut the door, and bake for 20 minutes or until medium golden brown (an instant-read-thermometer inserted into the center will read about 212°F). If planning to reheat the rolls to serve later, bake them only for 15 minutes or until pale golden (about 180°F).
12. Remove the rolls from the oven. Unmold and cool them top-side up on wire racks until just warm, about 20 minutes, then pull apart.
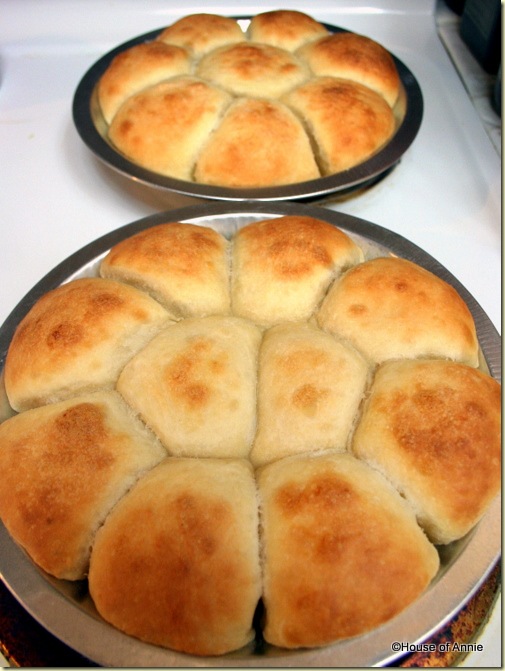
Buttery Dinner Rolls
Homemade Dinner Rolls Recipe
by Tanya Holland / Food Network
makes 24-30 dinner rolls
Ingredients:
1 (1/4-ounce) package dry active yeast
1 cup warm water, about 110 degrees F
1/2 cup sugar
1 egg, beaten
2 teaspoons salt
1 cup milk, scalded but cooled to warm
4 ounces melted butter, plus 2 ounces
5 cups flour, plus more, as needed
Method:
1. In a standing mixing bowl with dough hook, dissolve yeast in warm water. Let sit until lightly foamy, then stir in sugar and add egg, salt, warm milk, and 4 ounces of butter. Slowly add 5 cups flour, adding more as needed to make an elastic dough. Mix well, then roll out to floured surface and knead dough for about 5 minutes.
2. Place dough in oiled bowl, cover with plastic wrap, and set in a warm place to rise until double in bulk, about 1 hour.
3. Lightly oil your baking pan (I used round pie tins, the original recipe calls for muffin pans, your call).
4. Punch down dough and form dough into 1-inch balls. Arrange balls in baking pan and allow to rise an additional 1/2 hour.
5. Preheat oven to 425 F.
6. Brush with remaining melted butter. Bake in preheated oven for 10 to 15 minutes, until golden brown.
Enjoy both recipes and let me know which is your favorite! There is nothing like having fresh dinner rolls warm from the oven! Yum!
Cheers, Annie


Thanks so much for the recipes! I wanted to bake rolls for our Thanksgiving dinner but couldn’t find my “old faithful” recipe, so searched for one that was close. I tried the second one you offered, and WOW! These are the best rolls ever! So tender, so delicious and moist, and incredibly buttery!
I know that flours can be incredibly different, depending on gluten content, moisture, protien, etc. I ended up using about 8 cups of flour. The rolls were fluffy, light and gorgeous. I baked them in a pan that kept them very close together, and rolling the dough in butter before rising keeps them separated after baking.
I had a bit of extra butter after rolling the raw dough before rising, so after they were baked, drizzled a bit on each roll — it keeps them soft on top.
Thanks again for sharing, and Happy Thanksgiving!
After the second rise. Can I refrigerate my dough to bake for the next day.
Phyllis,
thanks for your comment. We haven’t done it, but I don’t see why not. If you do put in the refrigerator make sure you bring it up to room temperature again before baking. Let us know how it turns out for you!
I just pulled mine out of the oven…AMAZING! I did take one part from the 1st recipe and dipped the rolls in butter before the 30min rise and they are perfect!