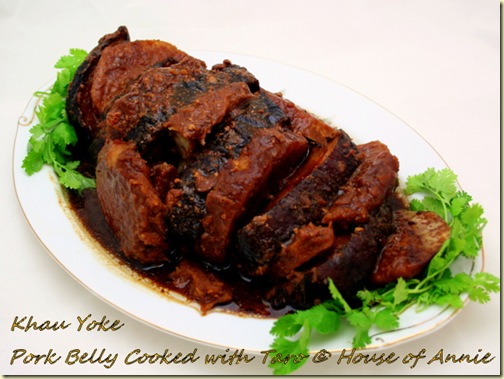
House of Annie takes you step by step to create this ambitious, yet delicious, dish of marinated pork belly and taro.
When I first got to know Nate, I found out that he loved Khau Yoke (spelled kau yuk in Hawaii). More specifically Wu tau khau yoke (wu tau is taro or if in Malaysia, known as yam). I love this dish too but had never tried to make it at home. It seemed like something that only good restaurants could make and I never thought I’d be able to replicate it at home.
But my friend Elizabeth (whose mom used to run a chicken rice stall and is a fantastic cook) shared her mom’s recipe for khau yoke with me many moons ago. I’ve always wanted to try it just never found the time or ambition. But recently, when I was looking through my list of recipes to try, I reconnected with this dish. And having had a taste for yummy pork lately, I decided I had to make this dish (and please my hubby at the same time!).
A bit of this and a bit of that
The only thing about Elizabeth’s recipe is that it doesn’t come with exact measurements. This is very common for recipes handed down from our parents’ or grandparents’ generation—I’ve found that so many of them just use the eyeball method so they never have precise measurements. “Oh, just throw in a bit of this and a bit of that and then taste and adjust” seems to be their mantra. So for this khau yoke recipe, I had to guess on amounts (and lucky you, readers, I noted them down—though again, use my measurements as a guide and go with your own tastebuds for best results).
Now, khau yoke is an ambitious dish and I recommend you do this only when you have the time as there are many steps. It isn’t totally difficult but there are many different cooking methods employed and then the steaming time is rather long so read the whole recipe through and map it out in your own head before attempting!
Things I learned
Here are some things I learned after making this dish:
1. Make sure your pork and taro are the same size in thickness and height. I had some pieces of taro that were taller than the pork and the bowl and those pieces did not soak up any of the sauce and so remained rather hard.
2. Steam it for the full 3 hours for maximum tenderness on the taro.
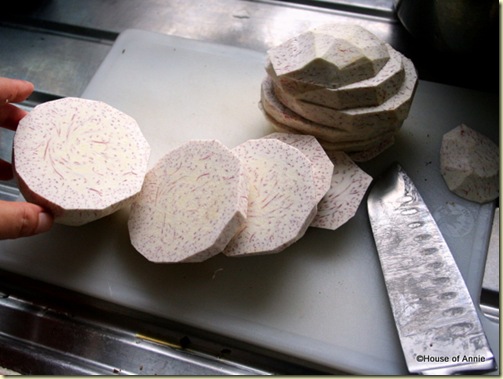
3. Don’t slice the pork and taro too thick but don’t make it too thin either as that will cause the taro to disintegrate. 1/4 inch thickness seems to be reasonable (I had 1/2 inch thickness and the taro did not soften well).
4. Make sure you get taro that is “powdery”. I have no idea what this meant really but thankfully, here in Malaysia, I just had to tell the seller at the market that I was making khau yoke and she chose the right taro for me. According to my mom, if you touch a cut piece of taro, the good ones will leave a trace of white powder on your finger or your knife. Try that out and see if that works for you.
5. When preparing taro, don’t get the taro wet as you’re peeling it. This will cause the taro to become slimy and slippery AND on top of that it could make your hands itch. Instead, use a paper towel to hold the taro as you’re cutting off the skin. Wipe off any residual dirt from the cut taro and do not wash. (If you absolutely have to wash your taro, slice them first, then put into a colander and run some water through and drain.)
6. Making khau yoke does involve boiling, deep frying, and steaming. Prepare ahead. It’s a complicated dish. And yes, I actually deep-fried AGAIN! Can you tell I love my husband?
Now, this recipe did end up giving me a LOT of khau yoke so I recommend that if you only want a small portion to halve it. OR, impress your friends and share some.
Khau Yoke recipe
Ingredients:
1/2 lb (300g) pork belly (buy it in a big slab)
1 medium taro (ask the vegetable seller to recommend a fluffy taro)
1/2 Tbsp thick soy sauce
2 tsp chinese 5 spice powder
Marinate:
1 1/2 cube nam yue (preserved red beancurd)
1 Tbsp taucu (brown bean sauce)
1 tsp sugar
1 Tbsp thick soy sauce (divided)
Oil for deep frying
Sauce:
3/4 cup – 1 cup water (add more water if you prefer more sauce)
1 tbsp oyster sauce
dash of pepper
pinch of Chinese 5 spice powder
1 tsp soya sauce
1 tbsp sugar
1 tsp Shao Hsing Wine
1/2 cube nam yue
1/2 tsp thick soy sauce
Method:
1. Bring a pot of water to boil. Blanch the pork belly for 2-3 mins to make for easier slicing. This process also helps to get rid of the porky smell and helps to achieve a slightly crispy skin when deep frying.
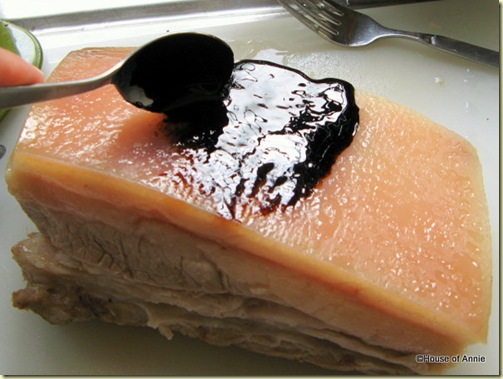
2. Remove from water and let cool. When cool enough to handle, use a fork to prick all over the pork belly skin several times.
3. Rub the belly pork with dark soy sauce & Chinese 5 spice powder. Leave to marinade for 30 mins.
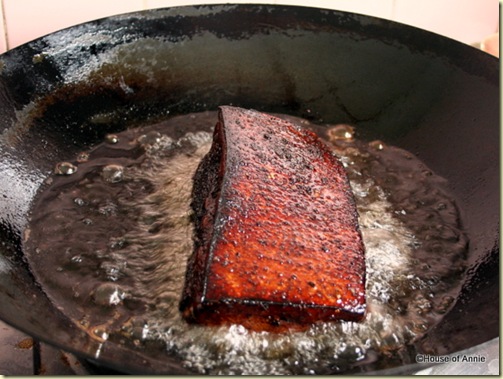
4. Heat oil for deep frying. Deep fry the pork belly till skin becomes crispy. Drain it on paper towels then cut the pork belly into thick slices. Don’t worry if meat is not cooked, you’ll be steaming for a long time!
5. Marinate pork slices with preserved red beancurd, brown bean sauce, sugar and dark soya sauce. Set aside while you prepare the taro.
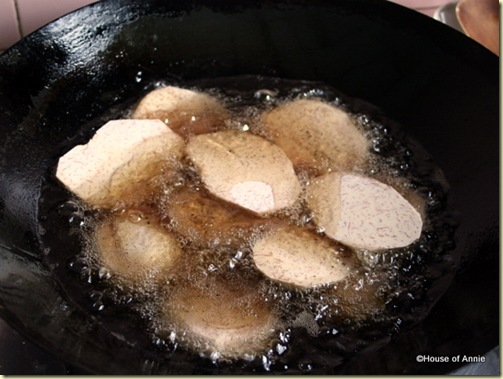
6. Peel the taro. Slice taro into thick slices about the same size as the pork belly slices. Deep fry taro pieces until golden brown. Drain on paper towels and set aside.
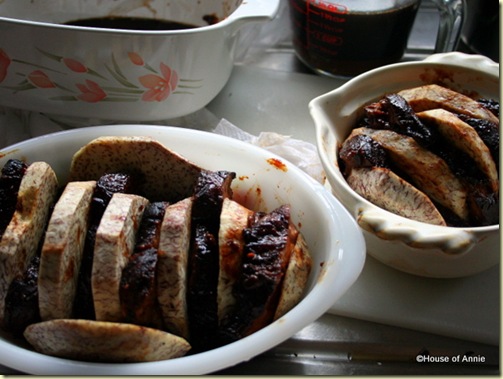
7. Use a deep bowl (not plate). You can either use individual porcelain rice bowls (to serve as individual portions) or a big porcelain bowl (I used a small claypot bowl and an oval corningware deep casserole dish). Alternate slices of yam & pork belly (make sure the skin side of the pork is facing down) in the bowl/s. Taro slices should be on the outer side on both ends (meaning start with taro slice and end with taro slice).
8. There should be some remaining marinade in the bowl where you have marinated the pork belly. To this bowl add the sauce ingredients.
9. Pour this mixture evenly all over the pork belly & yam slices in the steaming bowl.
10. Steam for 3 hours or until pork and taro are tender in a covered wok or steamer. Don’t forget to replenish water every so often to prevent burning your wok!
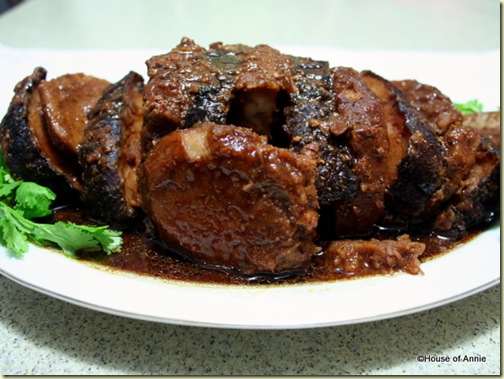
Before serving, Elizabeth recommends that you arrange lettuce leaves on a round large serving plate. Remove khau yoke carefully from the steamer & let it cool a little. Turn the steamed khau yoke over onto the lettuce leaves carefully.
If you’re not so good at this, forget the lettuce leaves and just place a plate over bowl and turn over that way to ensure less mess (like me!). Then decorate sides of dish with cilantro or other greens to make it attractive. And yes, this is important since you have taken the time to make this immensely complicated dish. Present with pride and watch husband devour!
Enjoy!
Cheers, Annie
>Hi Annie,
Wow! Your khau yoke really make me salivate right now. I haven´t make it in ages because powdery and fluffy yam is very hard to find here. I am glad you finally try out this recipe. Did it satisfy Nate´s tummy? 🙂
love,
eliz
>Wow, that is an ambitious dish to make! (Lucky Nate!) My mom loves kau yuk, but I always thought it was so fatty. But I love taro! I wonder if I can make it without the pork, and without deep-frying it first!
>Hi Annie. Looks delicious !
>This looks delicious!
>is there a fire sale of pork in your vicinity?
>Thank you very much for sharing the details steps, I like to eat this Hakka pork, will cook it one day.
>@all – thanks for your comments!
@Eliz – thank you for passing on the recipe to us!
@Ben – Unfortunately, with the results of your latest cholesterol test, I think you'll have to pass on this recipe.
@Borneoboy – thanks!
@Fresh – mmmm-Mmmm!
@Kong-Kay – bwahahaha 🙂
@Sonia – you're welcome!
>In Singapore, we sandwich the belly meat with a steamed bun 🙂
>Not only making this dish complicated, but the writing of the post and all your pics was a masterpiece. Thank you for sharing!
>Taro can make your hands itch!???! Who knew!
But man, does that fried pork belly look like a big piece of heaven. 😉
>@tigerfish – yeah, and we'll be attempting those steamed buns soon!
@Ninette – thanks for your kind words!
@Carolyn – the words "deep fried pork belly" are magic.
>Hi Annie, this is so wonderfully done! My mum used to cook this and I missed the chance to learn from her. 🙁 Now here it is! This recipe is kept! 😉 Thanks for sharing!
>I love pork belly, who doesn't? This dish looks fantastic. I can't wait to make this for the family.
>oh i love this dish, i'll have to cook my version soon, this brings back childhood memories! thanks!
>@homeladychef – thank you! I hope you get to try making it soon.
@Janice – pork belly is the best!
@3 hungry tummies – you're welcome!
hou geng ah.. going to try this, this weekend
Thanks for the recipe Annie! My mum was yearning to make her favourite dish and knew from the pictures that it was the real-deal 🙂 And it’s great for me since I get to learn more about cooking <3
Samaria26
Great! I’m glad you and your mother enjoyed this dish.
I remembered when I first had this dish- my dad made it and he said this was one of the dishes that was served at my mom & dad’s wedding. Oh I had wished he had shown me how he made it. This dish brought back memories for my mom & dad. Now I want to try it and see if my mom get’s teary-eyed.
Hey Annie, thank for the recipe. I was looking for it so long since my dad really loves kau yok..
With love from Cambodia
Dont worry sbt pork or animal fat. The us fda declared last year that animal fat wss not tge killer it has been made out to be. Rsther sugar and processes carbs. Particularly white flour. So enjoy your khau yoke without anxiety and guilt.
This recipe looks delicious. My mom, who is very health conscious, adds another step to the whole process by steaming the pork over water with a dish that has holes to let the fats drip out. When she cooks it this way, the fatty part of the pork belly is almost clear and gelatinous. It doesn’t leave your mouth with the greasy coating that fresh fats leave like from the edge of a steak. I’m not sure if she does this along with deep frying or instead of frying. But it’s something to experiment with!
Mimi,
thanks for your comment and suggestion!