I’m not a big fan of baking cookies. *Gasp!* Is that horrible to say?
As a baker, I’ve always enjoyed baking cakes more. I like that I just have to mix together my batter, pour into a pan, stick it into the oven and forget about it till it’s done. While waiting, I get to clean up my mess and when the cake comes out, I just have to wait a while, and I can cut into a large slice. Make myself some tea, and voila, I’ve got a tea-time snack all ready to go.
But every so often, I wish I could have a cookie.
Small Problem
Sometimes, I get a hankering for a really good chewy chocolate chip cookie. Other times, I wish I had some crispy Asian bite (like Chinese almond cookies). But I always find it so humbug to make them. And it’s so much worse now since I don’t have a large oven. It takes FOREVER to bake up a batch of cookies!
My oven is very small and it doesn’t have two levels. This means that when I make cookies, I have to wait around for one small batch (about 10-12 small sized cookies) to get done and then put in another and then another…see what I mean?
Perfect Solution
Recently, however, I found my solution: slice-and-bake cookies! These cookies are really easy to make and then when you get a hankering, just take the log of dough out of your fridge (or freezer) and slice however many you feel like baking. This doesn’t mean you can’t do them all at once but these slice-and-bake cookies are the best things to have around in your fridge for those days when you have unexpected guests or when you just need them for those pick-me-up, PMS, sugar-low moments. Once assembled, they can be stuck in your freezer or fridge for the moments you need them.
And what could be better for those holiday occasions when you have to bake many cookies? The dough can be made months ahead of the festive season and then taken out to bake right before the holidays. What could be more perfect?
Yes, I know the major Christmas-cookie-baking period is over. I seem to be very perverse and just cannot get myself to post cookie recipes during that time. Again though, I’m not too late for the Chinese New Year season and believe you me, I am seeing Malaysians here going absolutely crazy baking up cookies (they call them biscuits here). So I offer this recipe to my Chinese New Year-celebrating readers and to those outside who are just crazy for cookies all year round.
Marbled Chocolate-Vanilla Cookies Recipe
adapted from Fine Cooking Winter 2003, No. 54
Ingredients:
6 3/4 oz (1 1/2 cups) all-purpose flour
1/2 tsp baking powder
1/4 tsp table salt
4 oz (1/2 cup) unsalted butter, softened (I used salted and it was fine)
3/4 cup granulated sugar
1 large egg
1 tsp pure vanilla extract
2 Tbsp unsweetened cocoa powder
2 oz semisweet chocolate (preferably high quality—I used Cadbury’s dark chocolate), melted and cooled slightly.
Method:
1. Sift together the flour, baking powder, and salt.
2. In your electric mixer, beat the butter and sugar until light and fluffy.
3. Beat in the egg and vanilla, scraping down the sides of the bowl, and beat again until blended.
4. Add the flour mixture, beating until just combined.
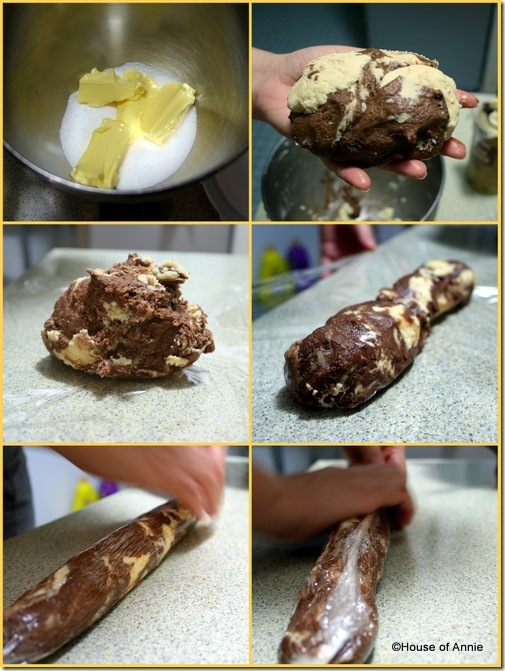
5. Remove about half the dough (about 9 oz); set aside.
6. Whisk the cocoa into the melted chocolate, then add the chocolate mixture to the other half of the dough and beat briefly to blend.
7. Divide the chocolate and vanilla pieces into about 8 pieces each (they don’t have to be exactly the same size). Put them together alternating chocolate and vanilla pieces, to create a marbled ball.
8. On a floured surface, roll and shape the ball into a log. The length of the log will depend on how large you want your cookie to be. I prefer to keep my cookies somewhat small so I divided the dough in half and made two 9-inch logs with about a 1-inch circumference. The original recipe calls for it to be ONE 9-inch log.
Making and Rolling the Marbled Chocolate Cookie Dough Log

9. Wrap in plastic and chill until very firm, at least 2 to 3 hours or up to 2 weeks in the fridge, and 3 months in the freezer. I recommend waiting overnight before baking (makes it easier to slice if the dough is really firm).
To bake:
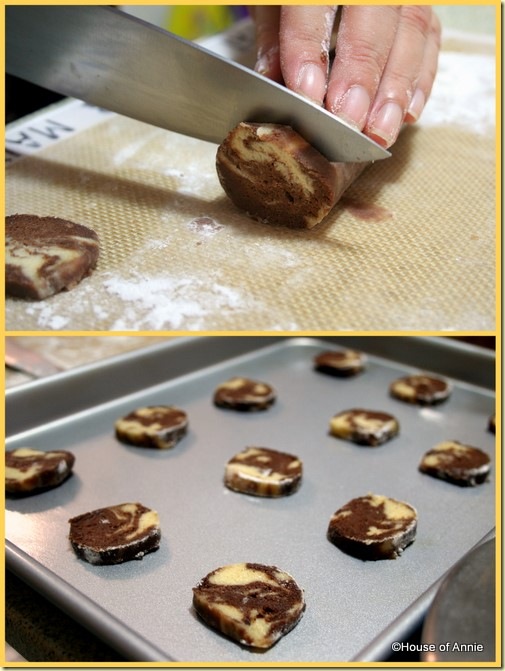
10. Preheat oven to 350 F (180 C). Cover your cookie sheets with parchment (I used a non-stick sheet).
11. Unwrap your log and roll the log briefly on the counter (dusted with a little flour) to rid it of any wrinkles and to reshape to circles if log is uneven.
12. Cut crosswise into 1/4-inch-thick slices; arrange the slices 1 1/2 inches apart on the sheets.
13. Bake until edges are lightly browned, 9 to 11 mins (don’t overbake so watch your first batch to get an idea on how your oven browns the cookies). Rotate your cookies sheets after 5 mins (top to bottom if baking two trays at once).
14. Let cool on the sheets for 5 mins; transfer to a wire rack to cool completely and store in a air-tight container.
15. Yields about 3 dozen large or 6 dozen smaller cookies.

Key Ingredients and Tips
This marbled chocolate-vanilla cookies are really divine. The key is using good ingredients. Make sure that you use real vanilla and really good semisweet chocolate (don’t use cooking chocolate—if you won’t eat the chocolate as is, you don’t want to use it in your baking also). The marbled effect is also really pretty when served. I believe you could probably make these into checkerboard cookies as well but I haven’t tried it. I’ll try them that way next time and if they can be done that way, I’ll add an addendum.
When you take them out to slice and bake, the ends of the log will tend to be more tapered. No biggie. Just tap them flat against your counter or after slicing, just pat them flat.
After shaping the logs, you will want to firm them up in the fridge. Every hour or so, turn the log around so that one side doesn’t get flat. Don’t worry too much if it’s not too even, you can roll them again before using. Also, if you want to freeze them, a good tip is to save your paper towel center rolls and slip your logs into them. The curve of the cardboard will help your logs to stay in shape.
One final tip – be really careful with the timing on your cookies. If you overbake them, you’ll get rock-hard cookies. When you do your first batch, keep a watch on the time and make sure that you check around the 8 minute mark to see how the cookies are doing. They should just be a light brown around the edges when you take them out of your oven. They might feel soft at that time, but they will firm up once they get cool.
Enjoy! I have another slice-and-bake cookie recipe that I will post soon (from the same Fine Cooking magazine—an Orange Poppy Seed one) and the amazing thing is if you bake them both together and store them together, the marbled cookie will pick up some orange fragrance that adds to their flavor even more. Come back to check that out!
Cheers, Annie
Do you have any favorite “slice and bake” cookie recipes?Share them in a comment!
More chocolate cookie recipes:
Chocolate Crack Cookies from White on Rice Couple
Chocolate Nutella Cookies from Simply Recipes
Jacques Pepin’s Chocolate Chunk Cookies from Cooking on the Side
Vegan Chocolate Chip Coconut Cookies from Burp and Slurp

pssssttt I dislike baking cookies too!!! i find it too much of a hassle :p
Beautiful cookies! I love the idea of just slicing how many you want to eat. The only thing is, if cookie dough is in the house, we would eat it before we ever got a chance to cook them.
That is so cool. I never thought of doing my cookie dough in that way. LOL. Thanks for the new and easy idea.
This is great… my kids will love these.!
I am pretty lazy in baking cookies for the same reason, it takes up too much time! Therefore, I make them only for special festive ocassions…but once I got the baking bug, I don’t really mind:) your tips are very helpful, shall keep this in view…thanks for sharing 😀
They do look really beautiful! And I like the idea of having it in the frig and cutting however amount you want or need to bake at the time. Perfect for single people! 🙂
This is such a great idea! I guess I should always make my cookie dough freeze and do what you did. Thanks for the idea
Really?? You don’t like to bake cookies? That’s like my favorite thing in the world to make. It’s almost like therapy — stirring up the dough, forming the individual cookies, and watching them turn golden in the oven. Mmmm!
I love baking cookies but have never tried it this way. Will give it a go, might make things a little easier.
Thanks for the tips and try to enjoy your cookie making 🙂
These cookies looked divine! I must try. I love to bake cookies but like Annie said, baking a tray at a time does takes a toll. I have a big oven but i only use one rack as most recipes asked to bake a rack at a time. Baking two racks at a time does not make the cookies undercooked for the bottom rack? I wonder..