I successfully take on the challenge of making this classic Persian dish for the first time.
We’ve been here in Kuching for over a year now, and we’ve settled in nicely. We’ve even had a chance to throw a few parties at our house, doing a Japanese dinner for our friends one night, and inviting friends over for Esther’s birthday in August. But I’ve been meaning to invite my boss to dinner. My boss is based in San Jose, but he works here half the time. He lives out of his hotel room and eats out for every meal, so I was sure he’d appreciate some home-cooked food.
So I invited him over to our house for dinner this past Saturday. My boss was born in Iran, so I thought it would be nice to make him some Persian food. I started researching dishes and recipes, and decided to make the classic Persian dish, chelow kabab koobideh – rice with mince meat kebab.
Making the Meat
My boss mentioned that he is a big fan of kebab, so I had my work cut out for me. I consulted a lot of kebab recipes, but eventually decided to try this one.
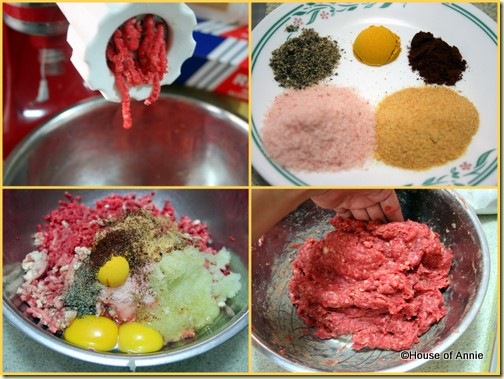
I started out by double-grinding a kilogram of beef chuck using our KitchenAid food grinder attachment – first using the coarse plate and second using the fine plate. Next, I grated a couple of onions using a box grater, and drained them in a sieve so that they were not too wet. For seasoning, I used Himalayan pink salt (we didn’t have kosher salt), fresh ground black pepper, turmeric powder, smoked paprika, and granulated garlic (we were out of garlic – d’oh!).
The onions and seasoning went into the bowl along with two eggs. I mixed and kneaded the meat until it everything was well combined. This recipe on Familyspice.com says that the meat should not be too wet or it will not hold its shape on the skewer. It should be light, airy, and not sticky. After the meat was mixed, I covered the bowl in plastic wrap and put it in the fridge to marinate.
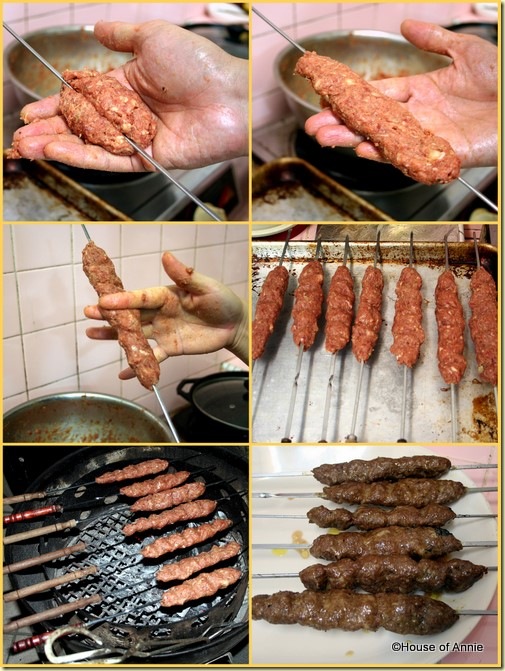
When it came time to cook, I fired up some charcoal on my WSM’s charcoal bowl (similar to how I grill ribeye steaks, but with less coal and no cooking grate. We had some kabob skewers which were thinner than the ones used for Persian-style kebabs. Taking a small ball of the meat, we wrapped it around the skewer and gently squeezed it into a long, flat cigar-shape. We then pinched the meat into sections using your fingers like scissors.
Note: The meat needs to be evenly balanced on the skewer, or else it will fall off to one side.
We placed the meat over the coals to cook, turning every minute or so until they were cooked through (about 10-15 minutes depending on how thick the meat was).
But What About the Rice?
For Persians, making rice is an art form. It’s not simply a matter of putting rice in an automatic cooker and pressing a button. According to the My Persian Kitchen site, there is a very detailed process for making Persian rice. But, this process would have been too time consuming for me, so I opted for this “shortcut” version on Jeffrey Saad’s website.
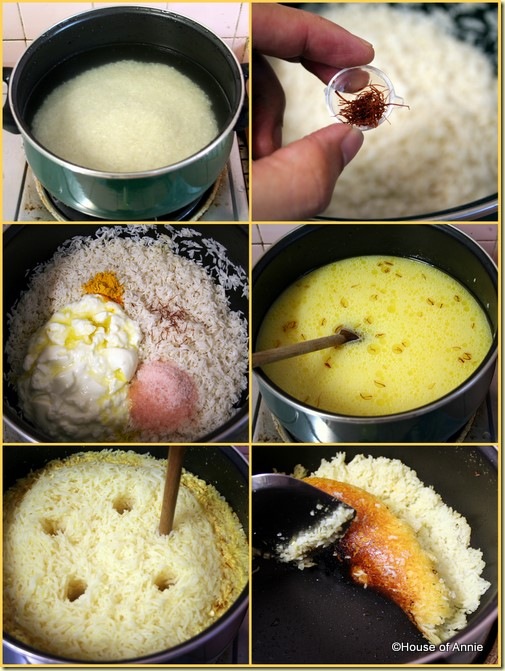
I started with 4 cups of basmati rice in a non-stick pot, rinsed until clear. I soaked the rice for a couple of hours, then drained it. To the rice, I added a 1/2 teaspoon of Iranian saffron, a cup of yogurt, 1/2 teaspoon turmeric powder, a couple of teaspoons of pink Himalayan salt, and a couple tablespoons of olive oil. I covered everything with 6 cups of water, mixed well, and brought it to a boil.
Once the water was boiling, I covered the pot and turned the heat to low for 20 minutes. At that point, the water was absorbed into the rice. I poked 5 holes into the rice using the handle of a spatula and poured about a tablespoon of olive oil into each hole, swirling the pot around to try and settle the oil to the bottom of the pot.
Then I turned the heat up for another 15 minutes before shutting off.
Why this next step, you ask?
After everything was done cooking, I scooped out all but the bottom layer of rice from the pot. As you can see in the last frame, the bottom layer of rice had turned into a nice, solid, crusty layer of rice. Persians call this “tahdig” – literally “bottom of the pot”. It is very tasty. So tasty, people will fight over who gets to eat the rice crust!
Plating Up
My boss arrived as we were grilling the kebabs, so I enlisted him to help cook while I got table set and the rice scooped into a casserole dish. I had also previously prepared a Persian cucumber and yogurt salad (maast-o-khiar) based on this recipe (but omitting the garlic) to be served on the side. As a final touch, we skewered some grape tomatoes and grilled them over the coals once the meat was finished.
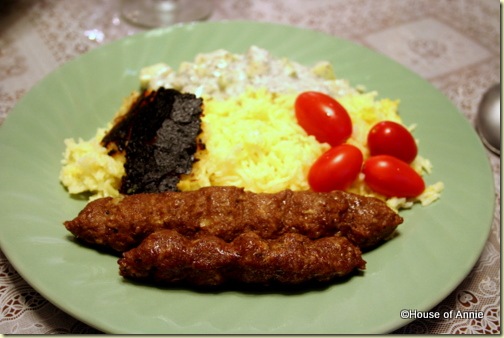
Each plate got a large helping of rice (including a piece of tahdig), a couple of skewers of kebab, some cucumber salad, and a few grape tomatoes.
Chelow Kabab Koobideh – Persian Rice and Kebab
The Verdict
My boss was impressed to be getting a homecooked Persian meal, and he tucked right in. And he liked it (he really liked it)! He said that the kebab flavors were spot on, and the only thing that was missing was some sumac spice. As for the rice, he said that it tasted good, but the basmati rice needed to be fluffier – I had overcooked it.
Everyone liked the meal, including the kids. Daniel even asked for seconds on the rice! I appreciated how each of the components – the meat, rice, cucumbers and tomatoes, worked together to make a wonderfully delicious combination. Still, there is room for improvement. I’m sure we’ll visit these recipes again!
Aloha, Nate


SO how do you get that delicious crust on the bottom or the rice without overcooking? I guess that’s the $20,000 question. Either way, I think it looks great! And how thoughtful of you to cook up a taste of home for your boss!
Camille,
I think the presoaking has something to do with it. The detailed process calls for draining the water after 10 minutes of cooking, and letting the rice steam over very low heat for 1 hour. So the rice does not sit in water very long that way.
Thanks for asking! We’ve got lots more basmati rice, so we’ll definitely try this dish again – probably doing it the traditional way. Stay tuned!
Great job, Nate, with this Persian meal! I love that crunchy “tahdig”, too. I used to eat it with sweet and sour sauce at the Buddhist temples.
Wendy –
wondering which Buddhist temples serve Persian rice. Please enlighten us?
Oh wow! This is great stuff. I had this in London at a Persian restaurant last month and it was deelish! It looked almost similar to yours… or vice versa ;-). Will post the pic on my blog when I get there….
Thanks for sharing and making it look so easy. Cheers!
I love the kebabs. We have a similar kebab in Bulgaria call kebabche (the -che on the end of the word is diminutive, making it mean something like cute little kebab.) I have never tried Persian cuisine, the flavors sound amazing!
Casey,
what would you say the primary flavors of kebabche are?
Very nice, Nate. Our kids went to a Persian’s home day care that had great food — the dad worked at La Foret. They also loved the tahdig (“crunchy rice”) and still order it every time we go to a Persian restaurant. I was not aware of the process to make it (besides just cooking it and the crust formed naturally) … thanks for the link.
Did your boss indicate that the sumac should have been mixed in the kebab … or just sprinkled about afterward?
Mike,
sprinkled on afterward.
What’s your favorite Persian restaurant?
Our current favorite Persian restaurant is Arya in Cupertino: http://www.aryarestaurant.com/ Top notch. Elegant but still friendly, too.
I love the tahdig took, although in my house I tend to get first dibs on it . . . the cook’s treat!
Rachel –
well since he was the boss, he got dibs. And the leftovers.
I’m thinking about how I can use a wider pot so I can get more tahdig next time!
A labor of love. I love what you did to the rice – it looks amazing. I wanna take a bite of the bottom crust. You must have impressed your boss! Thanks for sharing
Wow…you are in Kuching! Now you make me miss home and miss the wonderful Sarawak laksa in Kuching! Live your dish. That plate just looks irresistible….yum.
Mary –
thanks.
So you’re a Kuching-ite eh? Where’s your favorite Sarawak Laksa place?
You took a chance on Persian food and won my vote. Great job.
Ed –
thanks for your vote, even though we’re not in the PFB running anymore…
Thanks for the info about the KitchenAid and voltage converter. Did you find that there was any loss of power? I almost brought my wafflemaker to Jakarta (love those pandan waffles) but was advised not to because of dangers with the heating element. Any thoughts?
Also, seeing that rice crust reminds me of my fav dolsot bi bim bap. I order that solely for the crust. It kind of makes me miss my grandma’s old school rice cooker from the pre-teflon days!
Karen,
we brought our waffle iron, along with the KitchenAid, from the US. With the voltage transformer we bought here, they both work just like home.
Ooh, bibimbap is one of my favorite Korean dishes! There is enough of a Korean community here in Kuching to allow for a few Korean restaurants, so we’ll have to visit one soon…
Love persian food so just love your recipe. And that bottom pot rice IS so good, great job. Thank you for your vote!
Evelyne –
do you have a good recipe for chelow, especially one that makes a great tahdig?
My hubby would be jealous of your meat grinder. He’s been wanting to get one of those attachments for my mixer.
Good for you guys for hitting a home-run with that Persian feast. It looks awesome.
Carolyn –
the attachment isn’t that expensive, and we’ve put it to good use so it isn’t a white elephant item. It can be one of your Christmas presents to him. I’m sure Meat Boy will love it – he can make sausages to smoke in his Egg!
These would be exactly the meal that my hubby would love! You cook so well!
Angie,
Thanks!
I love Persian food. It’s so…sensuous. Kind of exotic, but with familiar flavors and that warm comfort. Next time I’m in Malaysia, I shall pay you a visit. 😉
Sophia –
you, and Mimi, can come anytime 😉
Sorry for being late, but I made it in time and voted for your cilantro avocado soup. Love kebabs and although we eat them often in Greece, have never made them myself. They sound delicious and you have inspired to make them.
Hi Ivy,
Great, well let us know when you make some, and I’ll buzz you too!
Wow! Great job! Tackling kabob can be a scary endeavor! I am so glad it worked out for you.
the crispy rice in last pic in burned
it’s colour supposed to be light brown not black. over heated
Thanks for your comment.
Yes, I realize that the rice was burnt in some parts. I think it was because of the gas stove not heating the pot evenly.
You should turn down the flame and use a flame spreader so tahdig will not burn.
Good Job Nate, for the Kabab, but thetype of the rice is not Chelow which usually served with Kabab, this type of rice is Tahchin which is served with chicken.
hi! I can’t seem to find the link of the meat recipe? Do you mind giving the measurements of meat, garlic, turmeric, etc?
Awesome…thank you for sharing.
Hi,
Can I have your chelow kebab recipe, the link is no longer there. Thanks.
Cel,
I believe the kebabs recipe is an adaptation of the Saveur recipe:
http://www.saveur.com/article/Recipes/Persian-Ground-Meat-and-Onion-Kebabs-