This is the recipe for the traditional, baked Chinese Mooncake that is typically eaten during the Mid-Autumn Festival. The mooncake filling consists of a salted egg yolk, surrounded by sweet lotus seed paste, which is wrapped in a thin, tender skin and then pressed into a round or square mold to impart a design onto the skin. The cake is partially baked, brushed with an egg wash, and then finished in the oven.
Last year, I got into making snowskin mooncakes and pandan spiral mooncakes for the Mooncake Festival. (The pandan spiral mooncakes are seriously awesome; I already have orders for more.) However this year, I decided that I had to try my hands with the traditional baked mooncakes. After making three batches of these mooncakes recently, I can say that they’re pretty simple to make, and they come out as good as or even better than store-bought.
Not Hard At All
Now, I’ve always thought that making traditional baked mooncakes were difficult. At least it seemed that way when people talked about how you had to get the skin right or it would not taste good. So I just never thought I’d be able to do it.
With Mooncake Festival just around the corner, I’ve made three batches of these mooncakes so far. I must say I’ve learned a lot about baking them. Are they really that difficult?
Honestly, if you live in Asia where the filling ingredients are easy to find and buy pre-made, and most of the other ingredients for the skin are also prepared for you, it’s not really hard at all. If you live in the West, where the ingredients may be more difficult to find and you’d have to make everything from scratch by yourself, then yes, I’d say it would be tougher.
So while I’m here in Malaysia, I’m taking full advantage of the fact that I don’t have to stir up my own batches of lotus paste filling. I can just drive to the nearest bakery supply store and buy myself some (they even come in low sugar varieties which is perfect for me!).
Baked Moon Cakes Recipe
Prep time: 1 hour / Cook time: 30 minutes
Ingredients for the skin
240 grams mooncake golden syrup
75 grams cooking oil
1/2 tsp baking soda
1/2 Tbsp alkaline water
300 grams superfine flour
Method
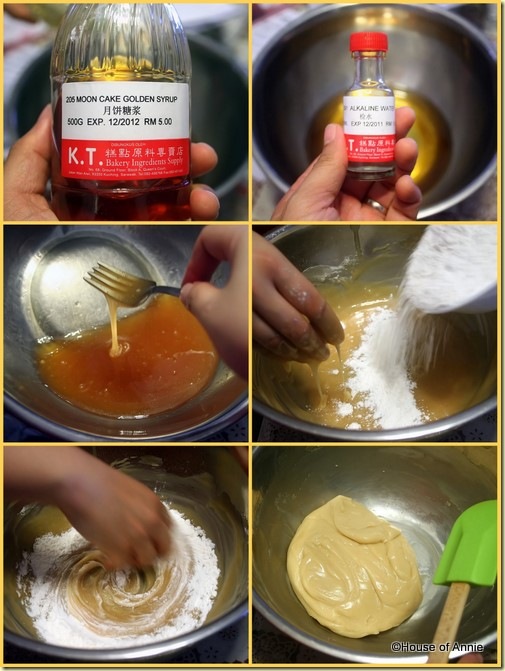
- Combine golden syrup, cooking oil, baking soda and alkaline water in a bowl and mix well.
- Slowly add the superfine flour to the liquid, using your hand to mix the ingredients well. The dough will be sticky like taffy.
- Wrap the dough in plastic wrap and set aside for at least 3 hours and up to 3 days.
Making Traditional Mooncake Skin Dough
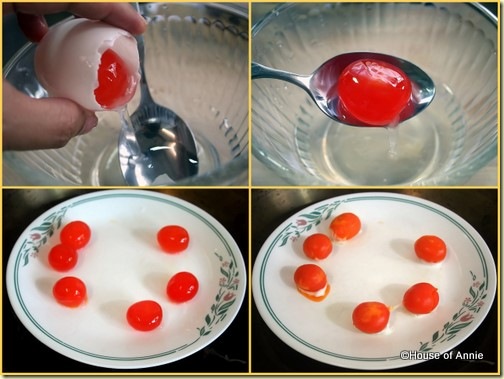
- If you’re planning to use salted egg yolks in your filling, you need to separate the yolks from the whites, then steam the yolks for 10 minutes over medium-low heat. Let the yolks cool before using.
Steaming Salted Egg Yolks
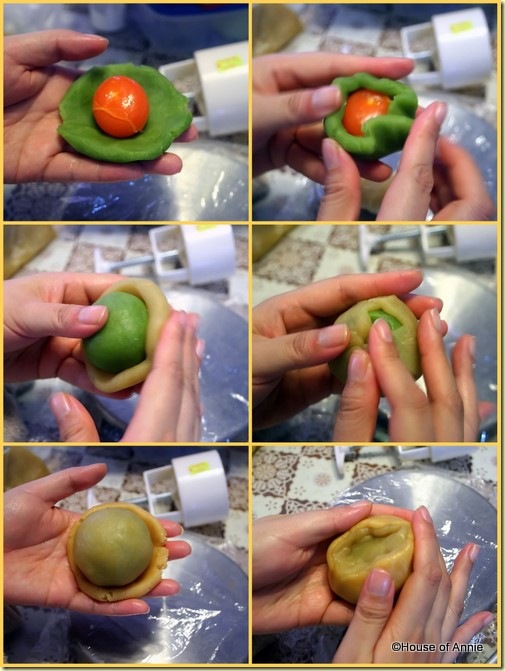
- Enclose the egg yolk in lotus seed paste filling (how much? It depends! See Tip #2 below). Take some of the dough for the skin and form a disc, then gently but firmly push the skin dough around the filling. Check often to see if there are any breaks in the dough.
Wrapping Traditional Mooncakes
- Preheat the oven to 200 degrees C.
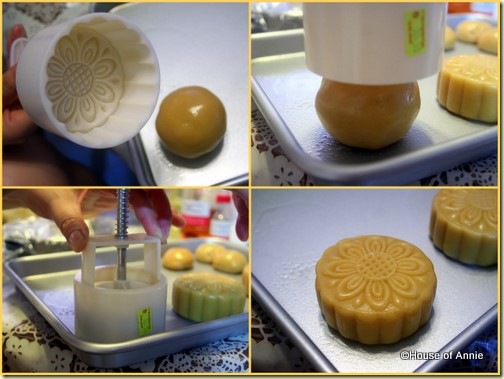
- Press the ball of dough and filling with the mooncake mold to impart the design. Set the molded cake on a greased tray.
Pressing Traditional Mooncakes
- Bake for 10 minutes, then remove from the oven to cool for 10 minutes.
- Lightly brush the top and sides of the cake with an egg yolk wash.
Brushing Traditional Mooncake with Egg Wash
- Return the tray to the oven and bake for another 8 minutes at 200 degrees C.
- Remove cakes from the oven and cool.
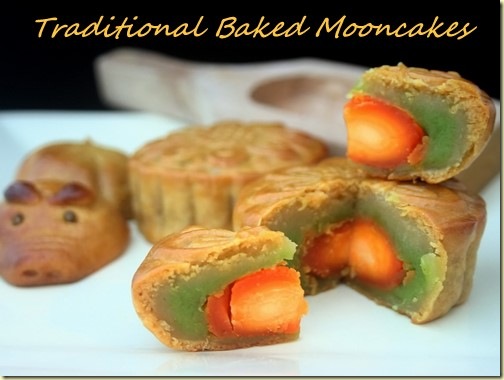
Traditional Baked Mooncakes
Important Mooncake-Making Tips
Most recipes you find on making mooncakes will only give you a list of ingredients and then provide simple instructions. Not so easy if you’re a newbie to making them and need more detailed instructions.
So here are some tips for mooncake making that I’ve picked up by talking to the bakery supply shop owner (who teaches a mooncake-making class) while buying ingredients, through reading recipes online and from mooncake cookbooks (yes, I actually bought a cookbook talking specifically about mooncakes) and by experimenting as I made my own:
Tip #1: Patience
Making traditional mooncakes is all about waiting.
After you’ve assembled all your ingredients and mixed it up, you have to wait. The shop owner told me to wait for three hours, which I did for the first batch. The cakes turned out alright but I decided to save half the dough to make more the next day and THOSE mooncakes turned out even better.
I guess you need to give the dough time to develop and smooth out. When you first mix the dough together, it has an almost taffy like texture–very sticky and wet. But after a long wait, the dough is smooth and tacky. Very much like soft Play-Doh and very nice to work with when you’re trying to stretch that skin as thin as possible to wrap around a large amount of filling.
Also, after baking the mooncakes, you should not eat them right away. Give your cakes a day before cutting into them. The skin will soften up a little bit more giving it the right texture and chew.
So, a long wait time before using the dough and a long wait time after baking the cakes and your mooncakes will be beautiful and tasty.
Tip #2: Precision
As with most baking recipes, you need to have a weighing scale when making mooncakes. The general rule of thumb on baked mooncakes is a ratio of one part skin dough to three parts filling. For example, if your mooncake mold can hold 120g of mooncake, then divide that number by four, thus making your skin 30g, and your filling 90g. If you add a salted egg yolk to the filling, then you need to weigh that and subtract that weight from the 90g of filling that you need.
Tip #3: Play
Making mooncakes may take patience and precision but it also has an element of fun. If you are the sort of person who likes to work with your hands, you will enjoy making mooncakes.
When you are mixing the skin dough, it is recommended that you mix with your hand–if you’re squeamish about getting your hands sticky, then this is not for you, but if you don’t mind, mixing with your hand gets the job done very well. I normally don’t like having sticky hands but this time around, I didn’t seem to mind it. I just considered it as extra exercise (the dough gets stiffer as you finish adding the flour slowly).
You also need to knead the dough after the resting period to make it more pliable. As you knead it, the color of the dough becomes more white and when you stretch it out, it will be more smooth and be less likely to break.
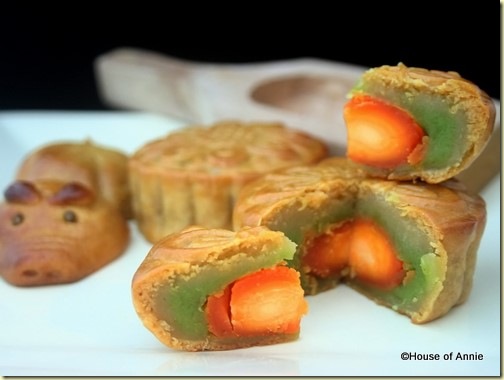
Another part of play happens when thinking about the filling. To date, I’ve bought white lotus paste, pandan lotus paste, durian pandan paste, and red bean paste. Initially I was using one paste for one mooncake but then I decided to try mixing them around. So recently, I wrapped one paste with another (keeping in mind the total weight) to see if I could get a different taste and visual effect. So far, I’ve mixed pandan with white lotus (the green color against the orange yolk is beautiful), and red bean with white lotus. I’ve been having fun!
The final part of play is the challenge of stretching that skin evenly to wrap around the filling. If you’ve kneaded it well, the dough will be pliable enough to stretch slowly into a thin skin for the filling. Don’t worry about perfect thickness too much as I usually find one part that is slightly thicker (the thinner part will have the filling shining through). This is not a bad thing as I use this thicker part for the part of the cake that receives the design. As you press the dough into the mold, the mold creates a beautiful design in the thicker skin.
Go For It
So there you have it, the traditional baked mooncake recipe. I hope you get to try it out for yourself. It really is easy once you get the hang of it, and it’s fun to do. Enjoy!
Cheers, Annie
If you like this recipe, please share it with your friends on Facebook, Twitter and other social networking sites!

Hi Annie,
I realised that you did not flour the surface of the ball before moulding it and it came out nicely. I did mine but it got all sticked and out of shape 🙁 Any idea why?
Hello Annie,
May I know what’s the subtitute for the alkaline water? Would love to try to bake one :-). Thanks in advance. Thank you.
Wan, you can just substitute a teaspoon of baking soda mixed with a teaspoon of water.
Hi Annie my mold is 125g and as u say divide by 4 if the mold is 125g so therefore the dough will be 31.25g and lotus paste how many grams?
Most of the recipe I went through, it ask to spray water on the mooncake before bake it. Why is it? and I don’t see it ask for it from your recipe.
Thanks
How do I bake it? I am using gas oven and all my heat is come from the bottom. Therefore, which rack level I should use? The top or the bottom rack? Thanks again
Where did you buy the alkaline water ?
May I know when you rest the dough for 3 days in cling wrap, you left it in the fridge?
Thanks.
Connie,
It doesn’t matter. If you put it in the fridge, though, you should let it come up to room temp before working with it.